

A fireplace damper repair can be easily achieved by installing a top-closing damper to take the place of a missing or existing defective damper. With a few simple tools and some very basic masonry skill and knowledge, you can remove your defective damper and install a new damper on top of your chimney that will seal tightly when the fireplace is not in use, and will keep rain and animals out of the chimney regardless of whether or not the damper is open or closed.
Some quick data to think with regarding an inoperable damper.
First, sometimes an inoperable damper can be made to work again with a little coaxing with a hammer and some WD-40 and some back-and-forth movement to work it free. I have had a high rate of success over the last 20 years with freeing up a damper that has been stuck open or closed due to lack of use. If a damper does need to be replaced, one can be mounted on top of the chimney. A top-mounted damper also acts as a rain cap that will keep water and animals out of your chimney. You can certainly appreciate the value of keeping animals out of your chimney if you have ever had one come in and decide to die in it. Wonderful odor in the house…
Types of top-closing dampers and points to consider before purchasing.
- A stainless steel top-closing damper/rain cap combination
- Low-profile cast iron top-closing damper installed on top of a chimney.
- Lock-Top top-closing damper installed on top of a chimney.
- Black cast-iron top-closing damper incorporated with a black rain cap. The damper is installed on top of the chimney.
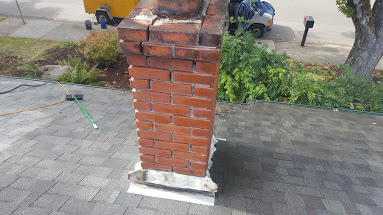
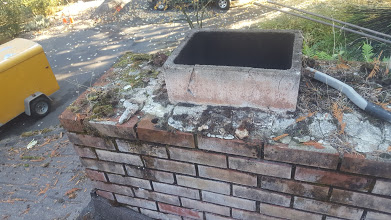
In order for top-closing dampers to be installed, there needs to be a solid crown and flue tile on top of a chimney that is in good repair. Loose bricks and loose or missing mortar joints need to be addressed before installing a top-closing damper. A crown is a bed of sand and cement (sand mix) poured on top of the chimney that cements a flue tile to the top of the chimney. Top-closing dampers are mounted onto the top of the flue tile with a high-temperature adhesive. Here is a photo of a crown, flue tiles and chimney in good repair.
One point to consider if a cast-iron top-closing damper (without a rain cap incorporated) is installed is that in freezing rain the top of the damper can freeze over, preventing the damper from opening (I have seen it happen.)
Doing it yourself
First, let’s talk about ladders and roofs. Most deaths from ladder falls occur from 10 feet ( 3 meters ) or less. If you have little or no experience with ladders, read up on this publication from the Oregon Occupational Health and Safety Administration: portable ladders.
When setting up a ladder, make sure the surface you are setting the ladder on is free of moss, ice, algae, etc. so that the ladder does not kick out from underneath you while traveling up and down the ladder. If you put the ladder against a gutter, put it where there is a gutter spike driven through the gutter. The spike effectively nails the gutter to the house. If you do not see the head of a gutter spike, then the fasteners are hidden within the gutter. You want to get the ladder against a spike or fastener to prevent the gutter from bending as you move up and down the ladder. Lash the ladder to a gutter spike or fastener so that it cannot be blown over in a strong wind. Extend the ladder at least 3 feet above the gutter so that you have railings to hold onto as you mount and dismount the roof.
Before you dismount the ladder and go on the roof, test the roof with one foot to make sure it is not slick. Wet, black algae can be deceiving and quite slick. Metal and aluminum roofs get slick very fast with just the slightest amount of water, so only go on these roofs on a dry day. Do not get on a steep metal or aluminum roof if you have no experience with such roofs, as they are very dangerous. When coming back down the roof towards the ladder it is much more stable to walk down backward towards the ladder at a slow pace.
If you are putting the ladder against a chimney, make sure the chimney is in good repair. You can knock loose brick over by climbing up a ladder placed against them.
Prior to installing your top-closing damper, you will need to remove the inoperable damper. I can remove most of them with a 3-foot long crowbar by simply prying the damper at the lower corners. This will usually pop the damper plate out. If that doesn’t work, I use a reciprocating saw or a grinder with a thin metal cutting blade attached. The worst case scenario is that you have to resort to an acetylene torch to cut out the damper.
Basic household tools, a good pair of wire cutters (or tin snips), a 1/4″ diameter masonry drill bit and an electric drill will get the job done.
Doing this project yourself can save you $300.00 – $400.00 or more. If you have any back-off ( unwillingness) on ladders or getting on a roof, hire a professional; your health and safety are not worth the savings.